Mostrando postagens com marcador Open Source. Mostrar todas as postagens

15 de out. de 2010

Microsoft attacks OpenOffice.org and open source with a damning video

Microsoft attacks OpenOffice.org and open source with a damning video: "
Filed under: , ,

In a typographical and punchy masterpiece, Microsoft has published a video that boldly attacks OpenOffice. You can watch it after the break.


The video is simple in its execution, using what seems to the spoken, damning testimonials of those that have used OpenOffice. Beautiful fonty goodness expands, diminishes, whooshes and slides as each and every one of OpenOffice's claimed benefits are torn to pieces.


The basic purpose of the video is to show businesses that switching to free, open-source software isn't as easy or efficient as it sounds. You know what you're getting with Microsoft Office -- while with OpenOffice it's hard for a business to predict its total support costs, and seemingly that's something businesses really hate.


I don't think Microsoft Office is actually much better than OpenOffice -- it's just that almost everyone, by virtue of Microsoft's 20-year monopoly of the workplace, knows their way around Microsoft Office. In fact, the only real claim made by Microsoft in the video is that its macro support is better -- the rest of its arguments seem to boil down to 'most of the world uses Microsoft Office; so should you!'


Better the devil you know, in other words.


Microsoft attacks OpenOffice.org and open source with a damning video originally appeared on Download Squad on Fri, 15 Oct 2010 11:30:00 EST. Please see our terms for use of feeds.


"

28 de set. de 2010

Upgrade Ubuntu from 10.04 to 10.10

Upgrade Ubuntu from 10.04 to 10.10: "
If you are currently using Ubuntu 10.04 and are interested in 10.10 you have choices – you can burn yourself an ISO and do a complete, fresh installation, OR you can upgrade using apt-get without having to bother with a re-installation. Of course I should warn you that, as of this writing, Ubuntu 10.10 is still in beta. That doesn’t mean you have to avoid the upgrade. It does, however, mean you run the risk of not everything working correctly. But if you are all-too-antsy to get that precious 10.10 on your machine…the task is actually quite simple.
In this article I am going to show you how to, from both the GUI and from the command line. After you are finished, you should have a working version of Ubuntu 10.10 beta. Of course, as 10.10 comes out of beta you can continue to update and have a full released version in no time.
NOTE: You can ONLY do this upgrade from 10.04. You can not upgrade from any earlier release. Also make sure you DO back up all of your data. Even though the upgrade process has become very reliable, you never know when something could go south.
From the GUI

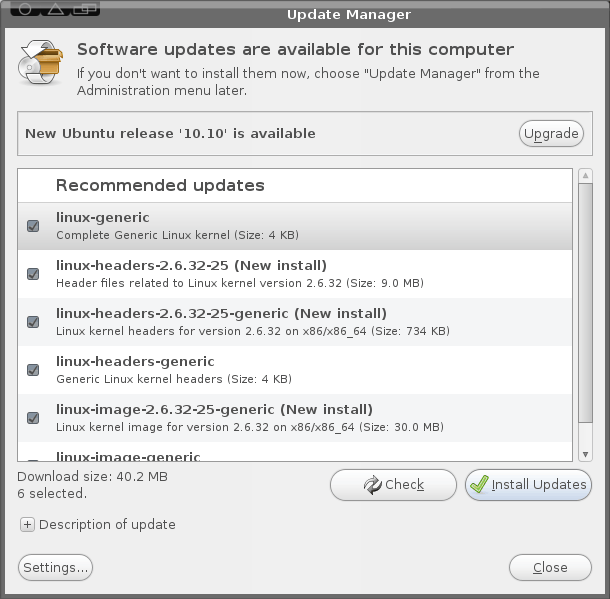
Figure 1
Let’s tackle this task from the GUI tool first (as that is how most will want to do this anyway). The first step is to open up the update manager in in “development release” mode. To do this hit Alt-F2 and type update-manager --devel-release and hit Enter. When you do this the update manager will open with a new addition – the Upgrade button (see Figure 1).
Before you actually hit the Upgrade button, you MUST install any and all updates for your system. If there are none listed click the Check button first. If you see any updates go ahead and click Install Updates and allow those updates to finish. NOTE: If the updates require a reboot, do so BEFORE you continue on to the upgrade.
Once you have completed all updates it is then safe to click the Upgrade button. Walk through the steps for this upgrade (they are very straight-forward) and reboot when completed.
From command line
Believe it or not, upgrading from command line is just as easy as it is from the GUI tool. The first step is to update your system. So open up a terminal window and issue these two commands:
sudo apt-get update
sudo apt-get upgrade

Of course, you will have to enter your sudo password for the first command. Once that is complete you may need to restart your computer (depending on if the kernel is updated or not). After that, you are ready for the upgrade. The first step is to issue the following command:
sudo apt-get install update-manager-core
Now we need to make a simple edit to the /etc/update-manager/release-upgrades. This file determines the default behavior for the release upgrader. The line you need to change is at the bottom of this file. Change it from:
Prompt=lts
to
Prompt=normal
Save and close that file and then issue the command:
sudo do-release-upgrade -d
When prompted, click Y to continue on with the upgrade. Once the upgrade is complete, you will need to restart you computer.
Final thoughts
Linux does make it easy to upgrade from release to release. I have run these upgrades many times and only rarely have I encountered a problem. Does that mean they are 100% guaranteed? No. Things happen…so please, make sure you backup all of your data before attempting this process.

© Jack Wallen for gHacks Technology News, 2010. | Permalink | Add to del.icio.us, digg, facebook, reddit, twitter
Post tags: , , , ,

"

Here comes LibreOffice -- an Oracle-free fork of OpenOffice

Here comes LibreOffice -- an Oracle-free fork of OpenOffice: "
Filed under:

First it was OpenSolaris, now it's OpenOffice. Yes, another previously-Sun-led initiative is being forked as a 'thanks-but-no-thanks' response to the arrival of Oracle on the scene.


The freshly-formed Document Foundation is being created to further the goals and aspirations of OpenOffice.org, and will produce LibreOffice -- a more community-focused project. Initial supporters of LibreOffice include the FSF, OSI, Canonical, and the GNOME foundation. Oracle has been invited to the party as well, though they've yet to RSVP.


As The H points out, there's some uncertainty about Oracle's commitment to OpenOffice development, hence the desire by a certain group to fork. The Document Foundation hopes that LibreOffice's independence from Oracle will attract more contributors and lead to an even better, more popular product.
"

13 de abr. de 2010

Luckybackup: Linux backup made easy

Luckybackup: Linux backup made easy: "
There are a lot of backup tools out there. From the overly simple to the overly complex. Many of those backup tools go unnoticed and unused. Some of them get recognized as the outstanding projects they are. One of those tools is Luckybackup. This tool was awarded Sourceforge’s best new project of 2009. There is a reason for that. Luckybackup is a simple to use backup tool that can backup both to a local machine and to a remote machine – with a user-friendly gui and all the features you would expect in a backup tool.
You might think that Luckybackup is a tool only an end-user could love. Not so. Although Luckybackup is simple to use, open source, and free it’s a worthy candidate for business backup as well. Oh sure, you’re not going to image your machines with this backup tool, but you can backup your data. In this article I am going to show you how to install and use Luckybackup.

9 de abr. de 2010

Microsoft to bring Linux APT/RPM-like application publishing platform (CoApp) to Windows

Microsoft to bring Linux APT/RPM-like application publishing platform (CoApp) to Windows: "
Filed under: , , , , ,
After a decade of vehement distrust for its open source cousin, Microsoft looks like it is finally ready to embrace one of the features that makes Linux and its variants so damn desirable.


Speaking frankly, Garrett Serack of Open Source Development at Microsoft laments the current state of open source package management and installation on the Windows platform. It's time for things to change, he says -- and, if you're a developer or open source aficionado, the Common Opensource Application Publishing Platform (CoApp) does sound pretty damn compelling.


8 de mar. de 2010

Zimbra: Algumas configurações

Algumas configurações uteis após instalação

Entrar no painel de administração https://host:7071/zimbraAdmin/ depois a Class of Service > default
- Features, activar o Instant Messenger
- Preferences – activar “Automatically login to instant messaging services”
- Preferences – activar “Use the GAL when autocompleting addresses”
- Advanced – Definir Quotas para os usuários

24 de fev. de 2010

Zimbra 6.0 e Centos 5.4

1. Instalar Centos
2. Editar /etc/hosts
127.0.0.1 localhost.localdomain localhost
xx.xx.xx.x webmail.domain.xx webmail
3. yum update -y
4. yum install compat-db gmp compat-libstdc++-296 compat-libstdc++-33 libtool-ltdl sysstat
5. yum remove sendmail
6. yum install fetchmail
6. Desactivar os serviços, exim, cups e bluetooth
7. chkconfig --level 0123456 exim off
8. Editar o ficheiro /etc/sudoers e comente a linha “defaults requiretty”
9. Editar o ficheiro /etc/sysconfig/i18n e deletar a linha LANG=”en_US.UTF-8”.
10. Executar
tar xvfz zcs-6.0.1_GA_1816.RHEL5.20090911181524.tgz
cd zcs-6.0.1_GA_1816.RHEL5.20090911181524
11. ./install.sh --platform-override
12 Quase no final da instalação, se tudo correu bem, o zimbra apresentará uma mensagem de erro, a informar que localhost.localdomain é um endereço inválido.
Setting defaults…No results returned for A lookup of localhost.localdomain
Checked nameservers:
XXX.XX.XXX.X
XX.XXX.XX.XXX
Ajuste as configurações de hostname e domain name.
DNS ERROR resolving localhost.localdomain
It is suggested that the hostname be resolveable via DNS
Change hostname [Yes] Please enter the logical hostname for this host [localhost.localdomain] zimbra.dominio.com
DNS ERROR resolving MX for zimbra.dominio.com
It is suggested that the domain name have an MX record configured in DNS
Change domain name? [Yes]
Create Domain: [zimbra.dominio.com] dominio.com
MX: zimbra.dominio.com(XXX.XX.XXX.XX)
Interface: XXX.XX.XXX.XX
Interface: 127.0.0.1
done.

12. Após ajustar o hostname e o domain, será apresentado um menu com várias configurações do zimbra. É necessário fazer algumas configurações
No menu 3) Zimbra Store Recomendo alterar:
4) Admin Password
12) Web server mode – De http para redirect, assim todo o acesso http é automagicamente redirecionado para https, adicionando um pouco mais de segurança para o usuário final.
No menu 1) Common configuration, ajustar o 6) TimeZone
Recomendo passar nos outros menus para verificar se as outras configurações a fim de refletirem o seu ambiente. Observar também se os endereços mostrados correspondem ao seu hostname e domínio.
Após o término da configuração, use a opção “a” para salvar e aplicar as novas configurações. O instalador passará por mais alguns pontos e com sorte, o processo estará finalizado em alguns minutos.

13. E já está

SNMP Ubuntu

Como instalar SNMP no Ubuntu

1. sudo apt-get install snmpd

2. mv /etc/snmp/snmpd.conf /etc/snmp/snmpd.conf.org

3. Criar /etc/snmp/snmpd.conf file:

rocommunity public
syslocation "xxxxxxxxxxxxxx"
syscontact email@localhost

4. Edit /etc/default/snmpd alterar

# snmpd options (use syslog, close stdin/out/err).
SNMPDOPTS='-Lsd -Lf /dev/null -u snmp -I -smux -p /var/run/snmpd.pid 127.0.0.1'

para

# snmpd options (use syslog, close stdin/out/err).
#SNMPDOPTS='-Lsd -Lf /dev/null -u snmp -I -smux -p /var/run/snmpd.pid 127.0.0.1'
SNMPDOPTS='-Lsd -Lf /dev/null -u snmp -I -smux -p /var/run/snmpd.pid -c /etc/snmp/snmpd.conf'

5. /etc/init.d/snmpd restart