Mostrando postagens com marcador Ubuntu. Mostrar todas as postagens

28 de set. de 2010

Upgrade Ubuntu from 10.04 to 10.10

Upgrade Ubuntu from 10.04 to 10.10: "
If you are currently using Ubuntu 10.04 and are interested in 10.10 you have choices – you can burn yourself an ISO and do a complete, fresh installation, OR you can upgrade using apt-get without having to bother with a re-installation. Of course I should warn you that, as of this writing, Ubuntu 10.10 is still in beta. That doesn’t mean you have to avoid the upgrade. It does, however, mean you run the risk of not everything working correctly. But if you are all-too-antsy to get that precious 10.10 on your machine…the task is actually quite simple.
In this article I am going to show you how to, from both the GUI and from the command line. After you are finished, you should have a working version of Ubuntu 10.10 beta. Of course, as 10.10 comes out of beta you can continue to update and have a full released version in no time.
NOTE: You can ONLY do this upgrade from 10.04. You can not upgrade from any earlier release. Also make sure you DO back up all of your data. Even though the upgrade process has become very reliable, you never know when something could go south.
From the GUI
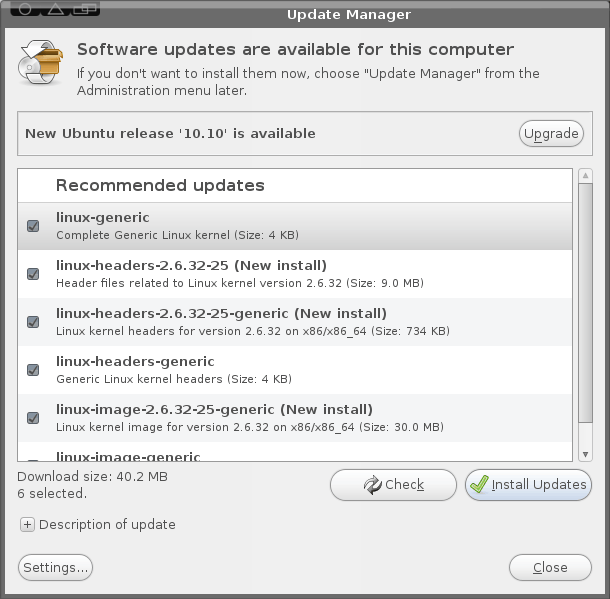
Figure 1
Let’s tackle this task from the GUI tool first (as that is how most will want to do this anyway). The first step is to open up the update manager in in “development release” mode. To do this hit Alt-F2 and type update-manager --devel-release and hit Enter. When you do this the update manager will open with a new addition – the Upgrade button (see Figure 1).
Before you actually hit the Upgrade button, you MUST install any and all updates for your system. If there are none listed click the Check button first. If you see any updates go ahead and click Install Updates and allow those updates to finish. NOTE: If the updates require a reboot, do so BEFORE you continue on to the upgrade.
Once you have completed all updates it is then safe to click the Upgrade button. Walk through the steps for this upgrade (they are very straight-forward) and reboot when completed.
From command line
Believe it or not, upgrading from command line is just as easy as it is from the GUI tool. The first step is to update your system. So open up a terminal window and issue these two commands:
sudo apt-get update
sudo apt-get upgrade

Of course, you will have to enter your sudo password for the first command. Once that is complete you may need to restart your computer (depending on if the kernel is updated or not). After that, you are ready for the upgrade. The first step is to issue the following command:
sudo apt-get install update-manager-core
Now we need to make a simple edit to the /etc/update-manager/release-upgrades. This file determines the default behavior for the release upgrader. The line you need to change is at the bottom of this file. Change it from:
Prompt=lts
to
Prompt=normal
Save and close that file and then issue the command:
sudo do-release-upgrade -d
When prompted, click Y to continue on with the upgrade. Once the upgrade is complete, you will need to restart you computer.
Final thoughts
Linux does make it easy to upgrade from release to release. I have run these upgrades many times and only rarely have I encountered a problem. Does that mean they are 100% guaranteed? No. Things happen…so please, make sure you backup all of your data before attempting this process.

© Jack Wallen for gHacks Technology News, 2010. | Permalink | Add to del.icio.us, digg, facebook, reddit, twitter
Post tags: , , , ,

"

9 de jun. de 2010

Join a Ubuntu machine to a Windows domain

Join a Ubuntu machine to a Windows domain: "
I had been hoping to accomplish this for some time now. At work we work under a Windows domain and I have a Ubuntu test machine that I have been hoping to join to that domain. Finally, thanks to Likewise-Open5, it happened. And, believe it or not, it’s not all that difficult.
Oh sure you can use Samba to take this task on, but you better be prepared for some serious configuration and work. With Likewise-Open5 that job is made significantly easier. Now I understand that with the upcoming major release of Samba, joining a domain should be much simpler. But with the tools we have now, Likewise-Open5 is your best bet. In this article I will show you how to join a Windows domain using a Ubuntu box.
Installation
Installing Likewise-Open5 is simple. Although there is a GUI that comes along with Likewise-Open5, we are going to install and use the CLI tool. Why? It’s more reliable. So for installation open up a terminal window and issue the following command:
sudo apt-get install likewise-open5
That command should pick up all the necessary dependencies and have you ready to join i no time.
What you need
In order to connect to your domain, you will need the following information:
  • Domain name: This is the domain name (FQDN) of the domain you want to join.
  • DNS: Although you may be tempted to use something like OpenDNS, you will want to use the DNS used on your domain.
  • Access: You will need to have an account that is able to join your domain.
You will also need some more information for configuring Sudo later.
Joining
To join the domain, the command you want to use looks like this:
sudo domainjoin-cli join DOMAIN USER
Where DOMAIN is the domain you want to join and USER is the username that has rights to join said domain.
You will be prompted for your password. Once you have authenticated, you have officially joined that domain.
Now, let’s set Likewise-Open to use this domain as the default domain. This will mean you can actually log into your domain from your Ubuntu login screen. In other words, you will automatically be joined upon boot. To do this open up the file /etc/samba/lwiauthd.conf and add the following line:
windbind use default domain = yes
Now, restart the daemon with the command /etc/init.d/likewise-open restart and all is well.
Leaving
If you want to leave the domain, just issue the following command:
sudo domainjoin-cli leave
Sudo
One thing you will notice is that, when you have logged in under the domain, your user has no sudo rights. In order to get around this you need to log into your machine as your standard user and edit your /etc/sudoers file. But at this point you need one more bit of information. You need to know the Group your user is a member of in Active Directory. Most likely this is Users. If that doesn’t work, contact your IT department and they should be able to tell you.
In the /etc/sudoers file, look for this line:
#Members of the Admin group may gain root privileges and do the following:
and append the following under it:
%DOMAIN\\GROUP ALL=(ALL) ALL
Where DOMAIN is the actual domain and GROUP is the group your user belongs to. Now if you log out and log back in your domain user should have sudo rights.
Final thoughts
Linux has come a long, long way. And I have confidence this process will soon become a part of either the installation or be included as an easy to use wizard. But for now, it’s no longer a harrowing experience to join a Windows domain.
"

27 de abr. de 2010

Recover Data Like a Forensics Expert Using an Ubuntu Live CD

Recover Data Like a Forensics Expert Using an Ubuntu Live CD: "
There are lots of utilities to recover deleted files, but what if you can’t boot up your computer, or the whole drive has been formatted? We’ll show you some tools that will dig deep and recover the most elusive deleted files, or even whole hard drive partitions.

15 de abr. de 2010

Create a Persistent Bootable Ubuntu USB Flash Drive

Create a Persistent Bootable Ubuntu USB Flash Drive: "
Don’t feel like reinstalling an antivirus program every time you boot up your Ubuntu flash drive? We’ll show you how to create a bootable Ubuntu flash drive that will remember your settings, installed programs, and more!

24 de fev. de 2010

SNMP Ubuntu

Como instalar SNMP no Ubuntu

1. sudo apt-get install snmpd

2. mv /etc/snmp/snmpd.conf /etc/snmp/snmpd.conf.org

3. Criar /etc/snmp/snmpd.conf file:

rocommunity public
syslocation "xxxxxxxxxxxxxx"
syscontact email@localhost

4. Edit /etc/default/snmpd alterar

# snmpd options (use syslog, close stdin/out/err).
SNMPDOPTS='-Lsd -Lf /dev/null -u snmp -I -smux -p /var/run/snmpd.pid 127.0.0.1'

para

# snmpd options (use syslog, close stdin/out/err).
#SNMPDOPTS='-Lsd -Lf /dev/null -u snmp -I -smux -p /var/run/snmpd.pid 127.0.0.1'
SNMPDOPTS='-Lsd -Lf /dev/null -u snmp -I -smux -p /var/run/snmpd.pid -c /etc/snmp/snmpd.conf'

5. /etc/init.d/snmpd restart