If you are currently using Ubuntu 10.04 and are interested in 10.10 you have choices – you can burn yourself an ISO and do a complete, fresh installation, OR you can upgrade using apt-get without having to bother with a re-installation. Of course I should warn you that, as of this writing, Ubuntu 10.10 is still in beta. That doesn’t mean you have to avoid the upgrade. It does, however, mean you run the risk of not everything working correctly. But if you are all-too-antsy to get that precious 10.10 on your machine…the task is actually quite simple.
In this article I am going to show you how to, from both the GUI and from the command line. After you are finished, you should have a working version of Ubuntu 10.10 beta. Of course, as 10.10 comes out of beta you can continue to update and have a full released version in no time.
NOTE: You can ONLY do this upgrade from 10.04. You can not upgrade from any earlier release. Also make sure you DO back up all of your data. Even though the upgrade process has become very reliable, you never know when something could go south.
From the GUI
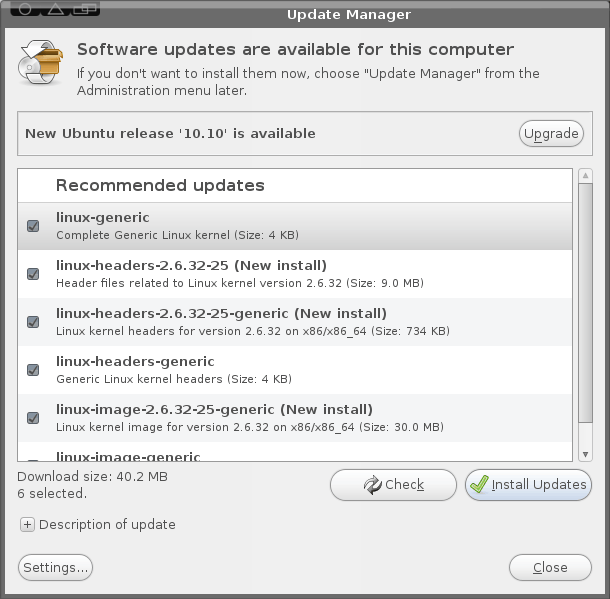
Figure 1
update-manager --devel-release and hit Enter. When you do this the update manager will open with a new addition – the Upgrade button (see Figure 1).Before you actually hit the Upgrade button, you MUST install any and all updates for your system. If there are none listed click the Check button first. If you see any updates go ahead and click Install Updates and allow those updates to finish. NOTE: If the updates require a reboot, do so BEFORE you continue on to the upgrade.
Once you have completed all updates it is then safe to click the Upgrade button. Walk through the steps for this upgrade (they are very straight-forward) and reboot when completed.
From command line
Believe it or not, upgrading from command line is just as easy as it is from the GUI tool. The first step is to update your system. So open up a terminal window and issue these two commands:
sudo apt-get update

sudo apt-get upgrade
Of course, you will have to enter your sudo password for the first command. Once that is complete you may need to restart your computer (depending on if the kernel is updated or not). After that, you are ready for the upgrade. The first step is to issue the following command:
sudo apt-get install update-manager-coreNow we need to make a simple edit to the /etc/update-manager/release-upgrades. This file determines the default behavior for the release upgrader. The line you need to change is at the bottom of this file. Change it from:
Prompt=ltsto
Prompt=normalSave and close that file and then issue the command:
sudo do-release-upgrade -dWhen prompted, click Y to continue on with the upgrade. Once the upgrade is complete, you will need to restart you computer.
Final thoughts
Linux does make it easy to upgrade from release to release. I have run these upgrades many times and only rarely have I encountered a problem. Does that mean they are 100% guaranteed? No. Things happen…so please, make sure you backup all of your data before attempting this process.
© Jack Wallen for gHacks Technology News, 2010. | Permalink | Add to del.icio.us, digg, facebook, reddit, twitter
Post tags: ubuntu, Ubuntu 10.04, Ubuntu 10.10, updating Linux, upgrading linux
"
Nenhum comentário:
Postar um comentário